Cursor functions are available for measuring waveforms. For details of how to use the cursor CLICK HERE.
Simply click on a button to initiate the designated operation.
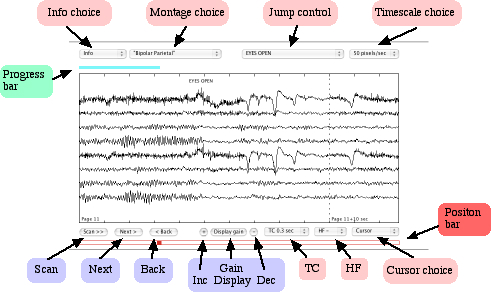
The "Show Montage" button (top left) displays a diagram of the current montage. When the montage diagram is displayed the button changes to "Hide Montage" which, when clicked, makes the diagram disappear.
This control shows the names of the available montages. When you select another montage the display changes to show the same page of EEG as recorded with the newly selected montage (a diagram can be shown or hidden as above).
The next control shows a list of possible sleep stage labels. The initial label is "Awake". (This facility has not yet been implemented)
On the right hand side at the top there is a control initially showing 20 pixels/sec which gives 30 seconds on a page. Ten seconds and five seconds per page (50 pixels/sec and 100 pixels/sec) are also available. Note: These are subpages - 3 or 6 to a 30 second base page - and the page number shows the base page and subpage {e.g. Page 20/3 }
The Scan >> button (bottom left) starts the system scanning through the record page by page. Each page is displayed for about 2 seconds but the time may be longer or shorter depending on the speed of your internet connection and on the amount of traffic on the internet at the time.
The "Next >" button allows you to page through the record. The dotted line at the left of the display indicates the beginning of the current page. A a small section of the previous page is displayed to the left of this line.
The " < Back" button allows you to display the whole of the previous page, the dotted line moves to the right of the display and a small section of the next page is displayed on the right. Subsequent clicks on this button display previous pages. Note: Use of the back button may incur a significant delay. This is due to the fact that Web files can only be read in the 'forwards' direction. It should not be more than a second or so for 'broadband' users but the delay may be significant (30-60 secs) for users with a slow dial-up connection.
There are four more controls at the bottom of the display
These refer only to the EEG and EMG channels unless a specific channel is selected. (See Advanced Cursor Functions.)
The Gain (size of the displayed trace) is altered by two buttons
"+" to increase the displayed size
"-" to decrease the displayed size
Clicking on the central button causes a message to appear in the 'message display area' showing the amplitude as pixels per "unit" - uV, mV, etc will depend on the channel or channels involved (See Advanced Cursor Functions.)
Time Constant - initially 0.3 sec adjustable to 1.0 sec and 0.1 sec. There is also a null setting "-" which shows the signal level as recorded (not very useful for EEGs because of electrode standing potentials and drift).
HF cut. This has three settings "-" where the display of fast activity is limited only by the effects of digitisation, HF 1 and HF 2 which rather arbitrarily reduce the amplitude of faster components.
Cursor. This sets the mode in which the cursor operates. For details click here. Note: The best way to learn to appreciate the effects of these (and indeed all the other) controls is to experiment while viewing the "Dummy EEG".

The 'Progress Bar' appears as a narrow rectangle (coloured blue)
at the top of the display.
The chief cause of delay in displaying the record is waiting for
the input buffer to be filled by reading data from a file
across the web.
The bar shows the filling of the input buffer.
This is particularly useful for users viewing a web page with a
slow (dialup) connection.

The 'Position Bar' appears as a narrow rectangle (coloured
red) at the bottom of the display. A small rectangle is filled
in to indicate the relative size and position of the page
currently being viewed.
If the page length is small relative to the length of the whole record
then the marker becomes a small triangle whose left hand edge
indicates the position of the page.
Click on the position bar to move to a different position in
the record, or alternatively drag the small rectangle to the desired position.
The marker may jump to a slightly different position when you release the mouse button. This is because the small rectangle indicates a 'page' and therefore must jump to the beginning of the page displayed.